> ## Content Index
> Fetch the complete content index at: https://blog.skitisu.com/llms.txt
> Use this file to discover other available public pages before exploring further.
# 使用阿里云函数计算C#.NET Core版制作一个腾讯Bugly日报转发到钉钉机器人的接口
- URL: https://blog.skitisu.com/aliyun-function-compute-csharp-dotnet-core-bugly-dingtalk-webhook/
- Published: 2019-06-14T14:48:25.000Z
- Updated: 2019-11-30T07:21:50.000Z
- Author: SkiTiSu
- Tags: 探索, 编程, 阿里云, 函数计算, C#, .NET Core, Bugly, 钉钉机器人, #Import 2026-10-21 14:41
**目录**
- [0\. 准备工作](#section-1)
- [1\. 创建项目,添加依赖](#section-2)
- [2\. 编写业务代码](#section-3)
- [3\. 编译与部署](#section-4)
一个简单的小POST转发还要编译一套程序然后部署并且运维?太复杂了!能不能只写一个文件就实现这样的功能呢?只要有Serverless的函数计算功能即可。这里使用阿里云函数计算功能(小量免费哦),其他平台同理。
# 0\. 准备工作
你需要有C#编程基础才能愉快的阅读本文章。如果你只使用过WinForm、WPF、ASP.NET等传统.NET技术,请不要错过.NET Core这个全新的跨平台产品\~(疯狂安利)
请准备好[.NET Core SDK](https://dotnet.microsoft.com/download?ref=blog.skitisu.com)以及一个文本编辑器,推荐使用VS Code。
请阅读腾讯Bugly和钉钉机器人相关文档。
推荐也阅读一下阿里云官方文档[函数计算 > 构建函数 > 编程语言 > C# > C# 函数入口](https://help.aliyun.com/document%5Fdetail/112379.html?ref=blog.skitisu.com),本文根据需求使用的是**HTTP 触发器**,但是这文档写的确实很乱,我看了半天才看懂……
# 1\. 创建项目,添加依赖
```shell
mkdir BuglyToDingtalkServerless
cd BuglyToDingtalkServerless
dotnet new console -f netcoreapp2.1
```
官方示例使用的是webapi模板,为什么这里使用console呢?因为webapi会创建一堆在函数计算中使用不到的东西,为了避免还要删除一堆。由于在撰写本文时阿里云还不支持最新的2.2版本,所以我们还需要指定.NET Core的版本。继续添加引用
```shell
dotnet add package Aliyun.Serverless.Core
dotnet add package Aliyun.Serverless.Core.Http
dotnet add package Newtonsoft.Json
```
最后得到的`BuglyToDingtalkServerless.csproj`文件如下
```
Exe
netcoreapp2.1
```
# 2\. 编写业务代码
创建一个文件,名称为`FcRemoteEntrypoint.cs`,当然你想塞`Program.cs`里也没问题。结合腾讯Bugly文档中的example(注意那里面有的参数名竟然是错的,考验英文水平的时候到了),进行开发,下面直接贴代码了,请看注释
(提示:点击代码段左上角的三个小按钮可以将代码全屏)
```csharp
using System.IO;
using System.Threading.Tasks;
using Microsoft.AspNetCore.Hosting;
using Microsoft.AspNetCore.Http;
using Aliyun.Serverless.Core;
using Aliyun.Serverless.Core.Http;
using Microsoft.Extensions.Logging;
using Newtonsoft.Json;
using System.Net.Http;
namespace BuglyToDingtalkServerless
{
public class SingleHttpHandler : FcHttpEntrypoint
{
// 钉钉机器人webhook地址
const string webhook = "https://oapi.dingtalk.com/robot/send?access_token=your_token";
protected override void Init(IWebHostBuilder builder)
{
}
// 这里是真正的入口
public override async Task HandleRequest(HttpRequest request, HttpResponse response, IFcContext fcContext)
{
string method = request.Method;
string relativePath = request.Path.Value;
fcContext.Logger.LogInformation("method = {0}; requestPath = {1}", method, relativePath);
// 读取请求内容
StreamReader sr = new StreamReader(request.Body);
string requestBody = sr.ReadToEnd();
fcContext.Logger.LogInformation("requestBody = {}", requestBody);
// 没有见过dynamic的话千万不要慌,这是动态类型,我只是为了下面写起来像js才这么玩的
// 用常规的JObject都可以的,就是下面引用值就变成了value["param"]
dynamic value = JsonConvert.DeserializeObject(requestBody);
string msgTitle = $"每日运营统计 - {value.eventContent.date}";
string msgText = "";
if (value.eventType == "bugly_crash_trend")
{
msgText += $"### {msgTitle}\n\n\n";
msgText += "版本: 用户访问量/崩溃次数/受影响用户\n\n";
foreach (var s in value.eventContent.datas)
{
msgText += $"[{s.version}: {s.accessUser} / {s.crashCount} / {s.crashUser}]({s.url})\n\n";
}
}
var msg = new { msgtype = "markdown", markdown = new { title = msgTitle, text = msgText } };
fcContext.Logger.LogInformation("ToDingtalkBody = {}", msg);
// POST拼好的json到钉钉webhook
await new HttpClient().PostAsJsonAsync(webhook, msg);
response.StatusCode = 200;
return response;
}
}
}
```
# 3\. 编译与部署
发布程序
```shell
dotnet publish -c Release
```
将文件夹下`bin/Release/netcoreapp2.1/publish`下的文件(一堆dll)打包成zip(不要将publish文件夹打包进去)
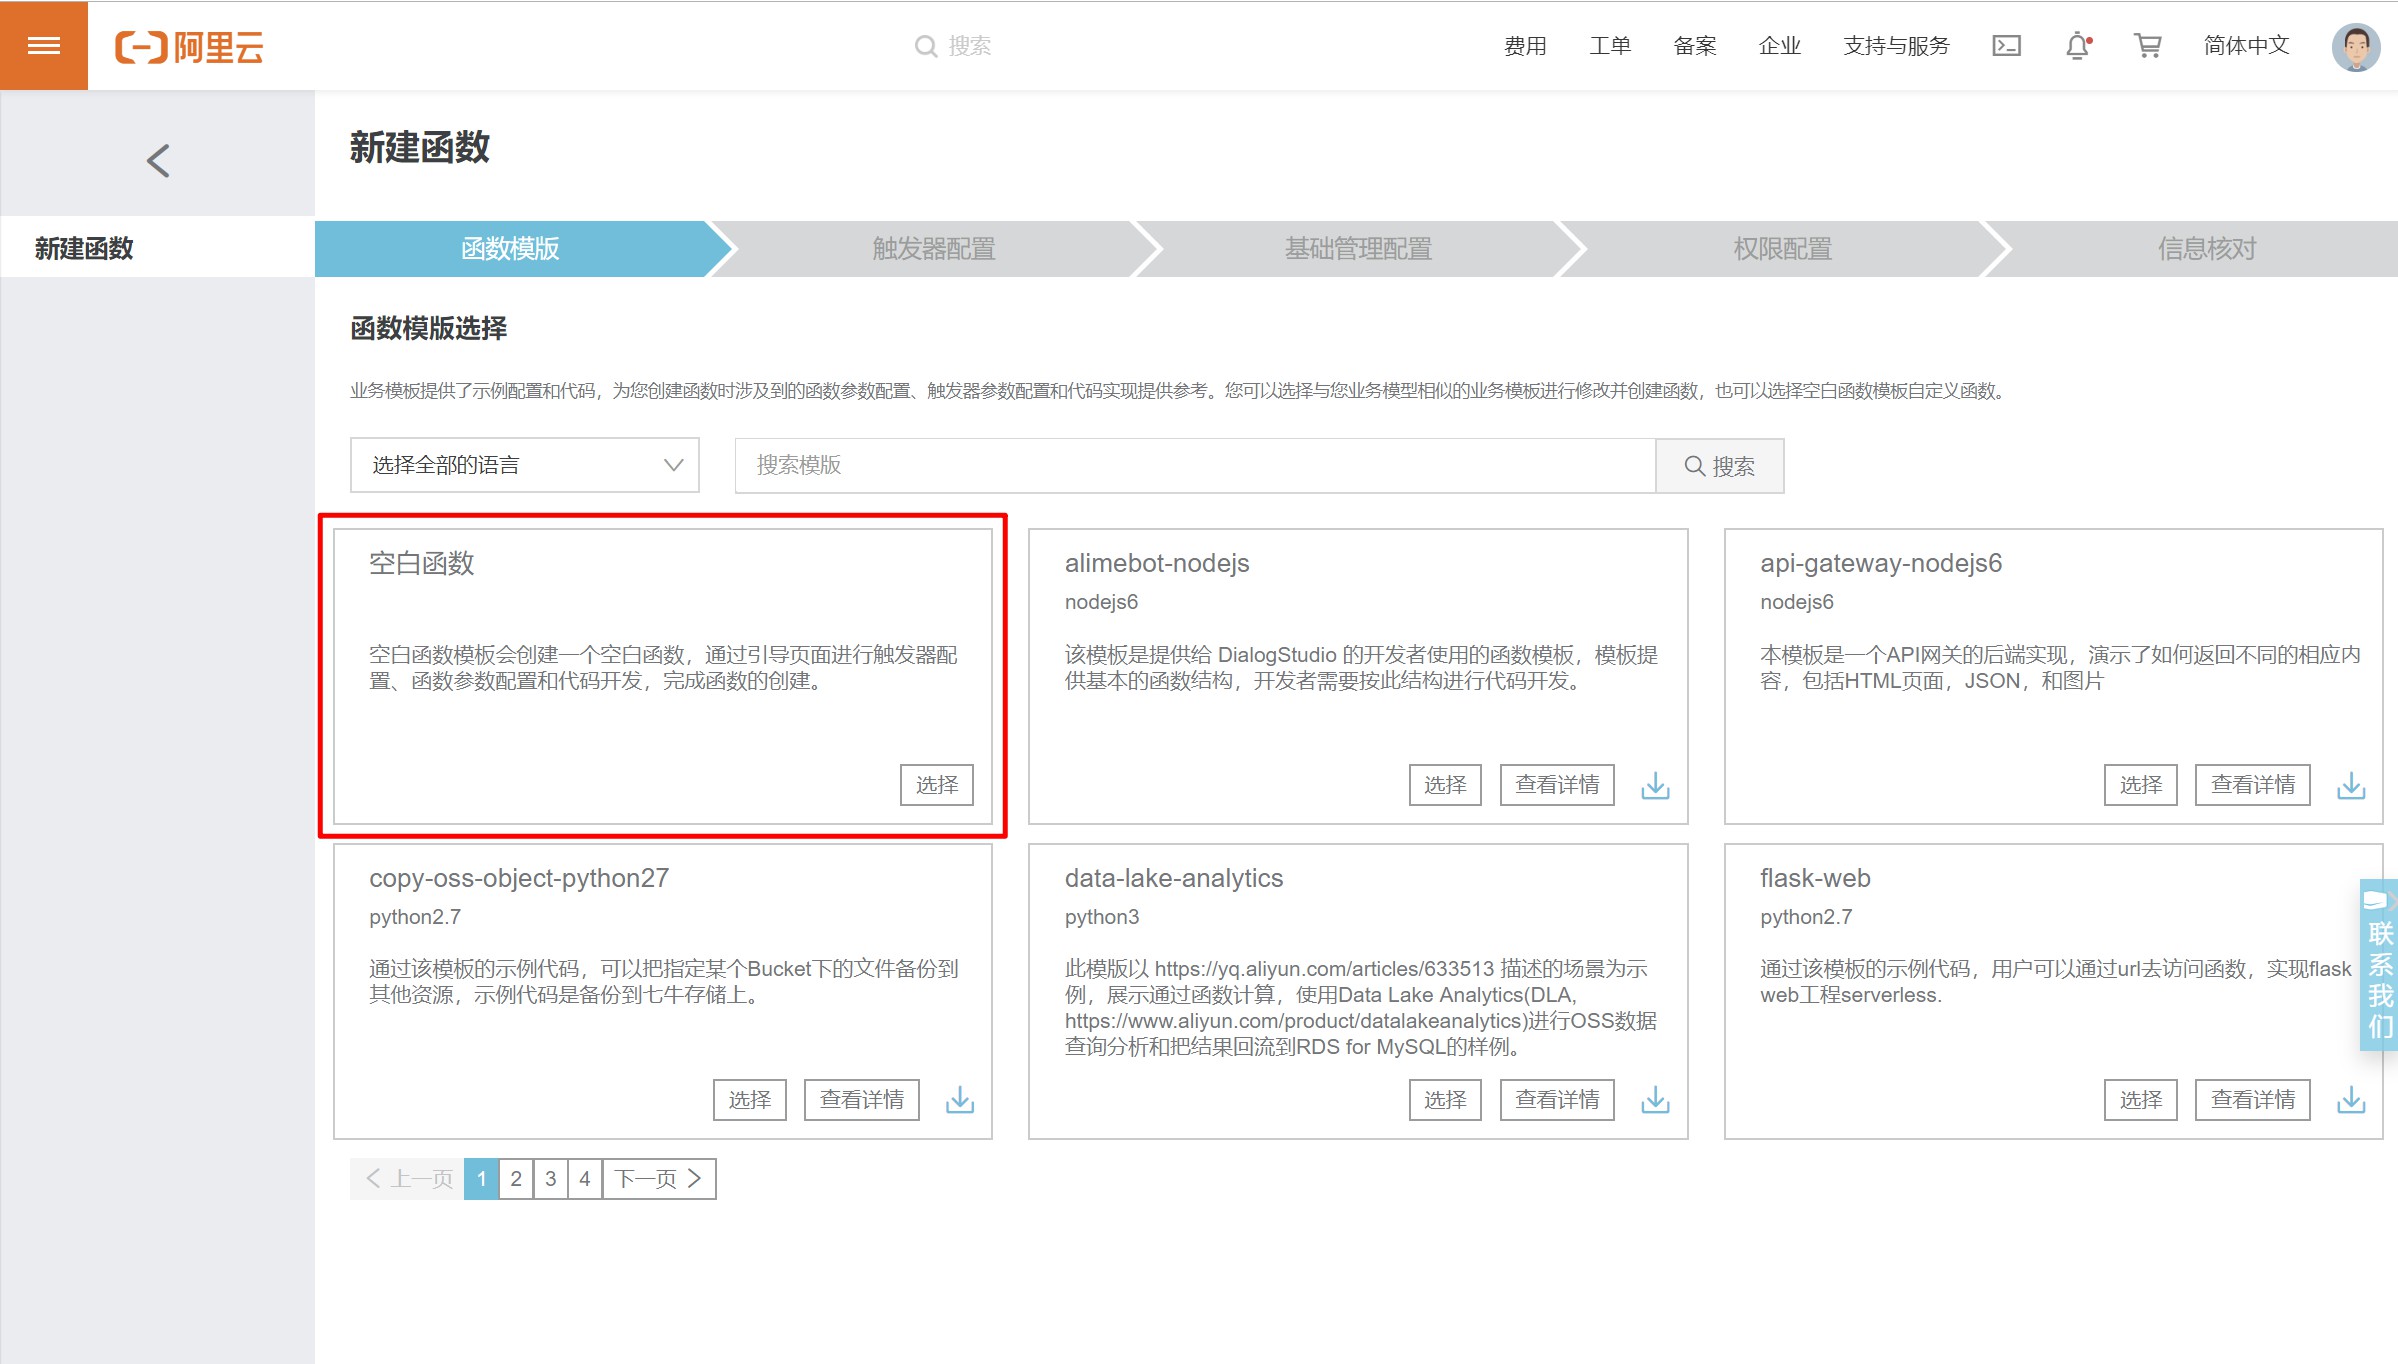
下面我们将程序部署到阿里云函数计算中,打开阿里云函数计算后台,新建函数,选择空白函数
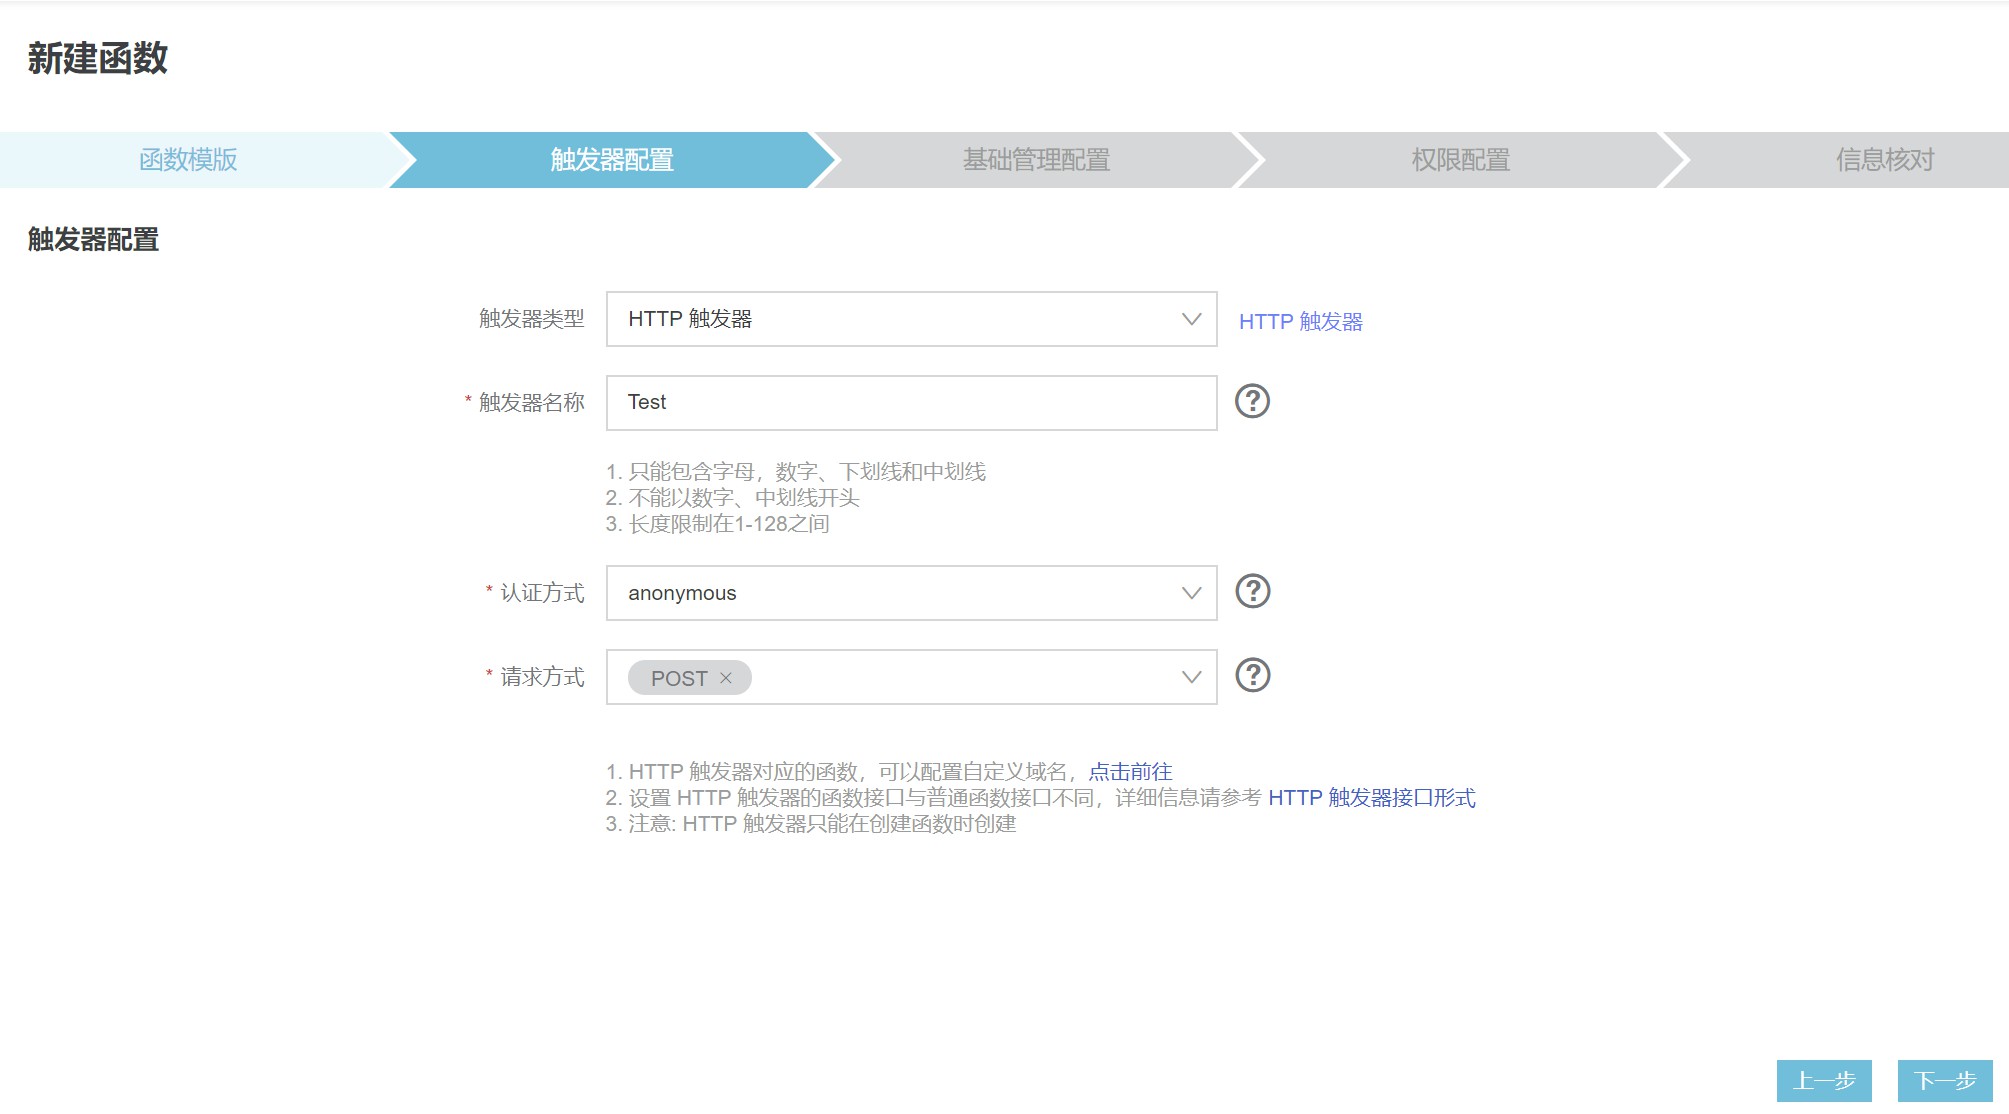
触发器配置,选择HTTP触发器,认证方式为匿名(因为腾讯Bugly的Webhook不支持认证),请求方式为POST
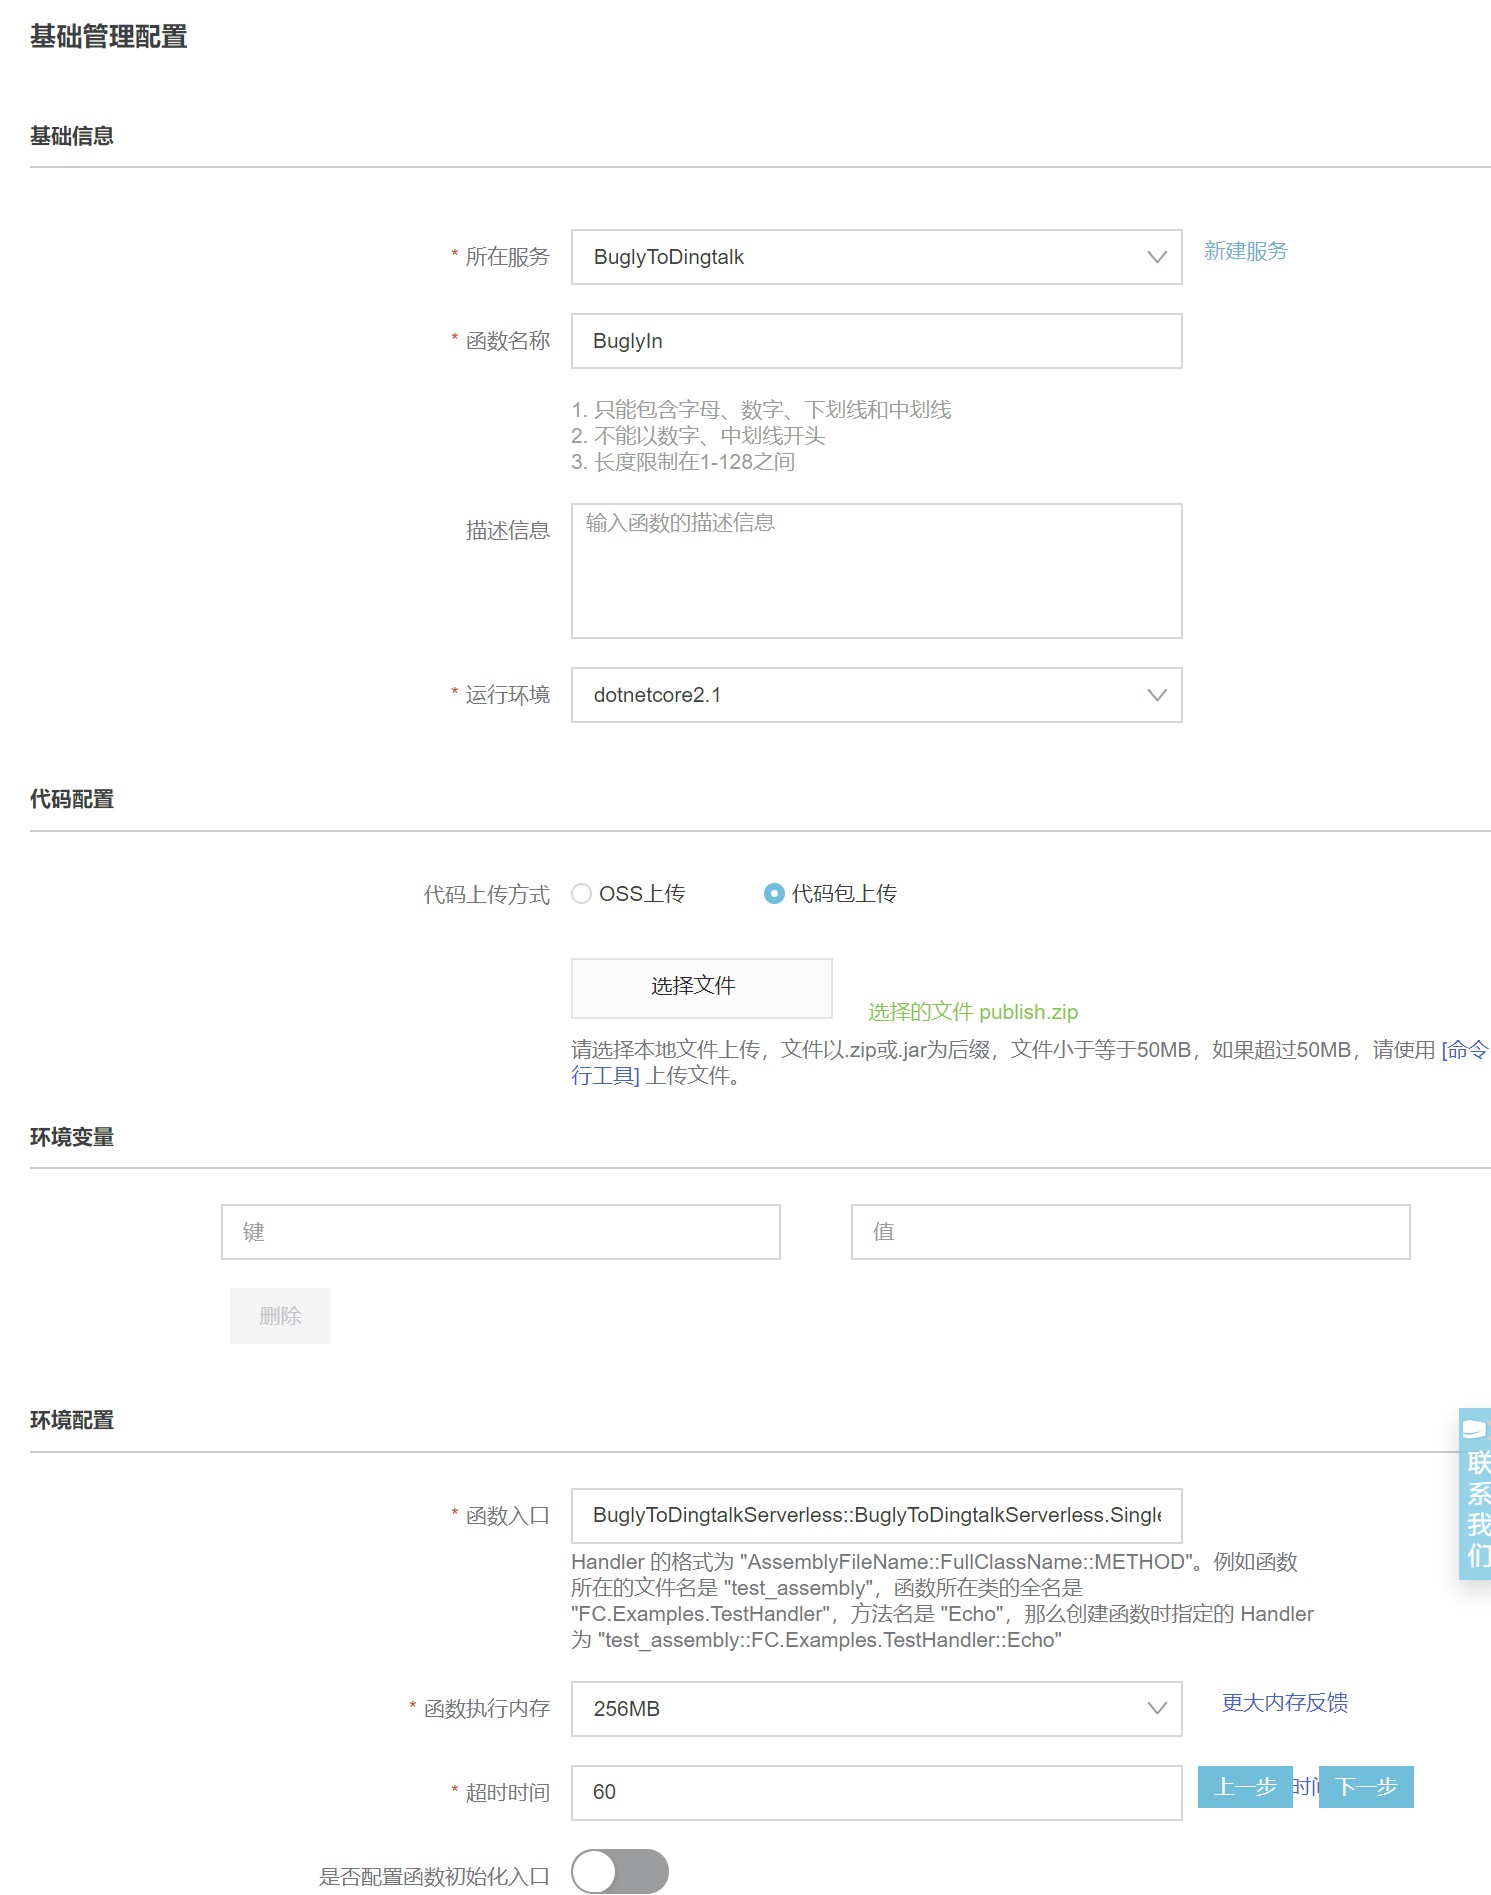
基础信息请按自己的喜好设置,运行环境请选dotnetcore,代码包上传选择之前打包好的zip
函数入口如果是按照上文中的代码来的话,设置为:BuglyToDingtalkServerless::BuglyToDingtalkServerless.SingleHttpHandler::HandleRequest
剩下的安全配置请根据实际情况配置。
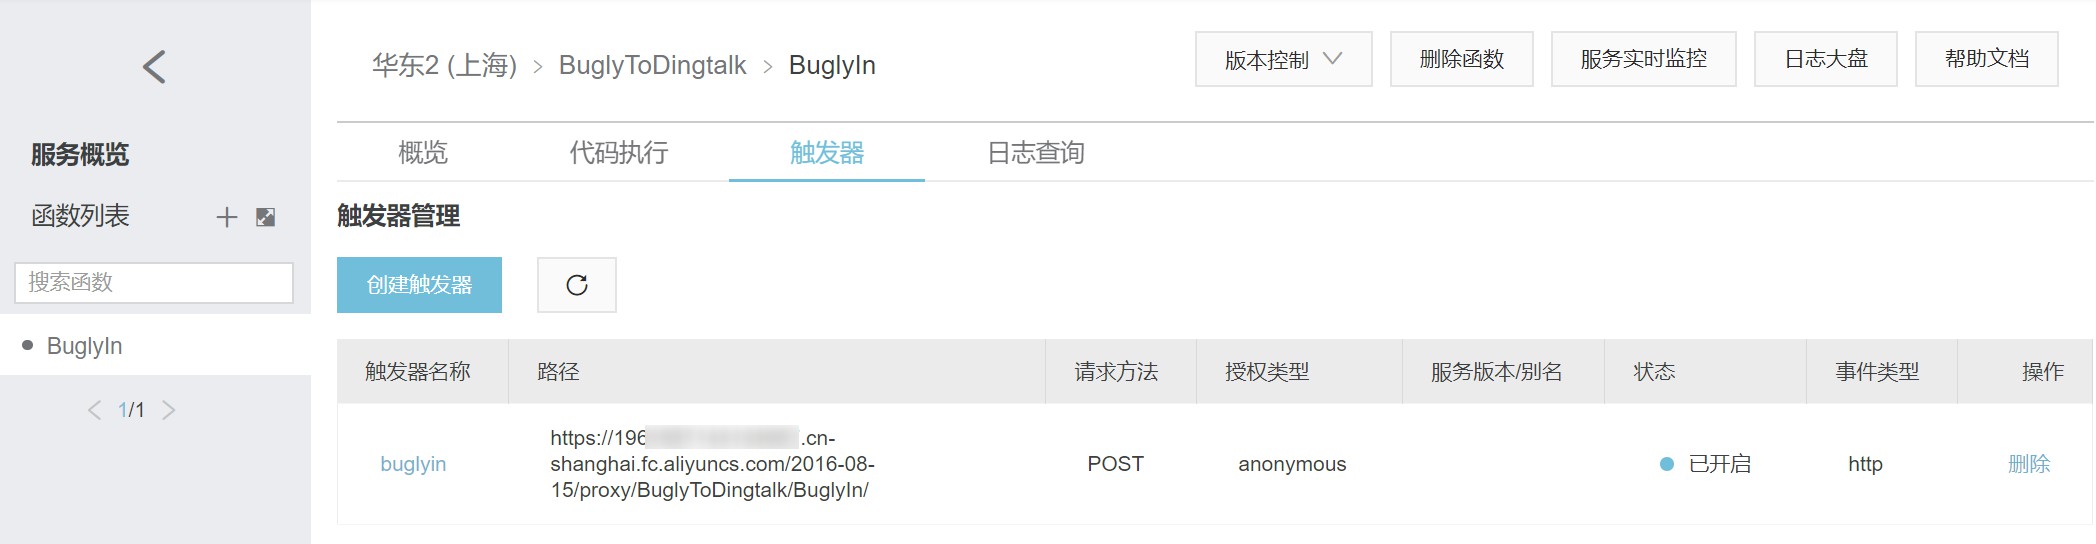
创建好后我们来到函数的触发器中,就可以得到供腾讯Bugly使用的Webhook地址了!将这个地址填入Bugly配置中,静候第二天早上9点的推送吧!(前提是应用有人用,产生了统计数据)
在此之前我们可以用假数据先测试一下,在代码执行里,请求方式POST,路径空,Body设置为raw,JSON格式,下面给到一份测试样例
```json
{
"eventType": "bugly_crash_trend",
"timestamp": 1462780713515,
"isEncrypt": 0,
"eventContent": {
"datas": [
{
"accessUser": 12972,//联网用户数
"crashCount": 21,//crash次数
"crashUser": 20,//crash影响用户数
"version": "1.2.3",//app版本号
"url": "http://bugly.qq.com/realtime?app=1104512706&pid=1&ptag=1005-10003&vers=0.0.0.12.12&time=last_7_day&tab=crash"
},
{
"accessUser": 15019,
"crashCount": 66,
"crashUser": 64,
"version": "1.2.4",
"url": "http://bugly.qq.com/realtime?app=1104512706&pid=1&ptag=1005-10003&vers=0.0.0.12.12&time=last_7_day&tab=crash"
},
{
"accessUser": 15120,
"crashCount": 1430,
"crashUser": 1423,
"version": "1.2.4",
"url": "http://bugly.qq.com/realtime?app=1104512706&pid=1&ptag=1005-10003&vers=0.0.0.12.12&time=last_7_day&tab=crash"
}
],
"appId": "1104512706", //appId
"platformId": 1, //平台
"appName": "AF", //app名称
"date": "20160508",
"appUrl":"http://bugly.qq.com/issueIndex?app=1104512706&pid=1&ptag=1005-10000"
},
"signature": "ACE346A4AE13A23A52A0D0D19350B466AF51728A"
}
```
Enjoy\~